Settling vs Checking vs Structural Cracks — Which Do You Have?
Log cabin crack diagnosis has gotten less clear-cut with all the conflicting advice flying around. As someone who panicked at 7 AM with a measuring tape convinced my foundation was collapsing, I worked through the fundamentals of settling gaps, checks, and structural damage. Today, I will share it all with you.
Spoiler: most of what you’re looking at probably won’t destroy your house. But let’s get the terminology straight first, because everything else depends on it.
Settling gaps are the horizontal separations between log courses — the stacked rounds forming your walls. But what is a settling gap, really? In essence, it’s a moisture problem. But it’s much more than that. As logs shed moisture, they shrink vertically, pulling away from the course above. My south-facing wall took the worst of it — quarter-inch gaps where afternoon sun hit hardest, longest.
Checking refers to the vertical or radial cracks forming inside individual logs. Picture a slice of trunk with cracks radiating outward like spokes. The outside dries faster than the interior — surface shrinks, interior lags behind, internal stress releases through visible cracks. I have a check running six feet up one log on my east wall. A forest service inspector told me flat-out not to worry about it. That was three years ago. Still fine.
Structural cracks are the ones that actually matter. Horizontal cracks spanning multiple logs, gaps wider than a dime, wood visibly separating — these point to something moving underneath. Uneven foundation settling. A rotting beam. Water damage you haven’t found yet. These need attention, not caulk and wishful thinking.
Most log cabins shrink five to ten percent in the first few years. Not all at once. The first heating season causes the most dramatic movement — you’re essentially baking moisture out of the logs for months straight. My cabin looked catastrophic in year one. By year two, roughly half those gaps had closed back up when summer humidity returned. Year three, things stabilized. Nobody told me that when I was standing outside with my measuring tape at sunrise.
When Settling Is Normal and When It Is Not
Frustrated by persistent gaps I couldn’t interpret, I called three contractors to assess the cabin using nothing but my anxiety and a vague sense that something was wrong. Two immediately tried to sell me full re-chinking. The third — a retired logger named Dale I found through a neighbor — spent two hours walking me through what was normal and what wasn’t. That conversation saved me somewhere around four thousand dollars.
Normal settling has a recognizable pattern. Gaps that appeared gradually over your first heating season. Gaps smaller in summer, larger in winter. Visible checks that aren’t weeping water or hosting insects. Doors that stick occasionally but still open. A floor that reads level on a 4-foot level. Nothing that makes you think the walls are actively separating.
Abnormal settling looks different — and feels different, honestly. Gaps wider than three-quarters of an inch that are still growing. Doors you can’t close without leaning into them. Windows with cracked panes from uneven pressure. Chinking failing across large sections, crumbling, pulling away, showing daylight. Water leaking inside during rain. A floor slope that wasn’t there six months ago. Gaps appearing over weeks instead of months.
I made a spreadsheet. Quick callout up front, because knowing these benchmarks would have saved me the spreadsheet entirely. I measured five locations every month for a year. My south wall fluctuated between half an inch and three-quarters of an inch seasonally. My north wall held steady around a quarter-inch year-round. Neither got worse. Both were completely normal.
For genuinely abnormal settling, professionals use slip joints and adjustable screw jacks — mechanical systems installed beneath the cabin or integrated into posts and beams that allow controlled movement as settling continues. The cabin settles gradually without fighting the movement structurally. Don’t DIY this with caulk. This is engineering work, full stop.
DIY Fixes for Settling Gaps Between Logs
Confronted by a five-eighths-inch gap between my second and third log course on the west wall, I spent a full Saturday untangling conflicting internet advice. Caulk versus chinking versus doing nothing. I ended up splitting the difference — and it worked.
The rule is simple. Under one inch: caulk. Over one inch: chinking. Most of my cabin had sub-inch gaps, with three or four spots creeping toward that threshold.
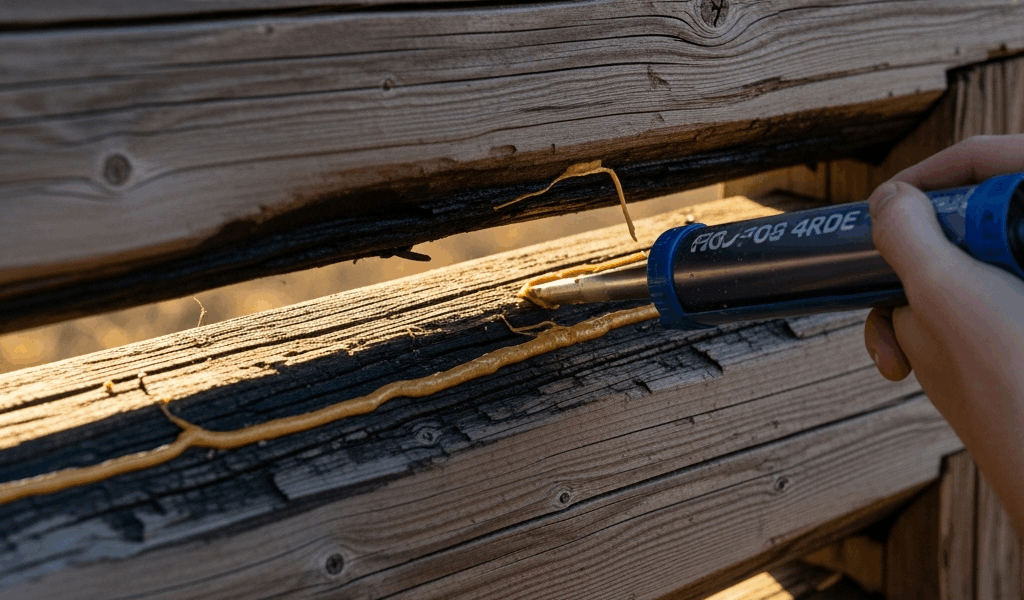
For gaps under one inch, you need three things. A flexible paintable exterior wood caulk — I’m apparently a DAP DryDex person and that product works for me while generic hardware store caulk never holds up past one winter. Natural oak color, fifteen dollars a tube. Backer rod, which is a foam cord you compress into the gap before caulking. And a caulk gun — eight to twelve dollars at any hardware store if you don’t already own one.
Don’t skip the backer rod. This is where most first-timers go wrong. Measure your gap width, then get backer rod slightly larger in diameter than that measurement — the compression as you push it in creates a better seal. Use an old putty knife or plastic scraper to seat the rod about half an inch below the log surface. That depth matters. Flush backer rod leaves no room for the caulk to do its job.
Cut your caulk tube tip at 45 degrees, run a continuous bead along the gap, smooth with a wet finger or a cheap caulk tool. My first attempt looked like I’d applied it during an earthquake. My second looked professional. The learning curve is real but genuinely short — maybe one tube of practice.
DAP DryDex dried in three hours. Paint over it to match your logs, or leave it. Either works.
For gaps over one inch, you need actual chinking. I avoided traditional mortar — labor-intensive and too rigid for seasonal log movement. I’m apparently a Big Stretch person here too, and that product works for me while mortar-based options never accommodate the expansion cycles properly. Big Stretch stays flexible after curing, which is the whole point.
Installation mirrors the caulk process: backer rod first, chinking material over top. Chinking is thicker and stickier, filling larger voids more completely. Expect to apply two passes for gaps approaching two inches or wider.
Two warnings. Don’t apply any of this in winter or rain — I caulked a gap in October with rain in the forecast and the material failed in two weeks. Save yourself the trouble I had. And don’t assume a sealed gap stays sealed forever. These materials are flexible, not permanent. Seasonal shifting is normal. You’ll revisit certain spots every few years. That’s just cabin ownership.
Fixing Log Checks and Surface Cracks
While I was fixated on the gaps between logs, a vertical check running down an interior log in my great room quietly developed a small opening. I almost missed it entirely.
Checks don’t need sealing in most cases — and this is worth saying clearly because a lot of first-time cabin owners treat every surface crack as an emergency. A check is just wood responding to humidity. It’s not structural, and it’s not a water problem unless water is actively collecting inside it. I ask one question now when I find a new check: is water actually getting into this? Is the wood dark or soft nearby? If no, I leave it alone. That’s what the forest service inspector told me, and three years of watching my own checks confirms it.
For upward-facing checks — the orientation where water can pool rather than run off — a flexible exterior caulk is appropriate. Not for structural reasons. For rot and insect prevention. I sealed the upward-facing check on my largest interior log with a single tube of flexible caulk. Twenty minutes, maybe. It hasn’t needed attention since.
For insect prevention, I applied a borate wood preservative around my foundation logs and the larger visible checks. Borax-based preservatives genuinely work against carpenter ants and termites — not a gimmick. Whether you need it depends on your region. I’m apparently a carpenter ant region person and this approach works for me. A gallon of liquid borate runs thirty to forty dollars. A basic pump sprayer costs five. I did the most vulnerable spots and called it done.
Honest assessment: I probably didn’t need to treat my checks at all. Three years in, nothing has colonized them. But the borate treatment cost me maybe fifty dollars total and an afternoon, and I haven’t regretted the peace of mind once.
When to Call a Pro Instead of DIY
There’s a point where you stop being a homeowner doing sensible maintenance and start being someone in denial about needing structural help. I got close to that line when a section of chinking began pulling away from the logs in a pattern I couldn’t explain.
Call a professional when you see widespread chinking failure across multiple walls — not an isolated section, but consistent separation everywhere you look. Foundation movement visible to the naked eye. Active interior water leaks. Logs that feel soft when you press a screwdriver tip against them — if it sinks in easily, that’s rot and it’s serious. Horizontal cracks widening month over month. Doors and windows that have stopped functioning despite your attempts to address settling.
Finding a qualified log cabin specialist is harder than finding a contractor who will happily charge you for work you don’t need. I interviewed five people before I found the right one. Three immediately quoted full re-chinking. One quoted eight thousand dollars for complete rechinking and recaulking — and when I asked why everything needed replacing, his answer was genuinely vague. That was enough information.
The fifth contractor — a woman named Lisa who runs a log cabin restoration company about forty minutes from me — came out and actually diagnosed the problem. She used thermal imaging. Turns out water wasn’t getting in anywhere. The chinking failure I’d been worried about was cosmetic. The real issue was drainage under my deck creating chronic moisture conditions that were accelerating log checking. She recommended fixing the deck drainage, caulking specific problem areas, and leaving the chinking entirely alone. Two thousand dollars for the assessment and deck work. A different contractor would have charged eight thousand for work that wasn’t needed.
Re-chinking an entire cabin runs four thousand to twelve thousand dollars depending on size and material. Structural log replacement goes significantly higher. I didn’t need either. I needed someone capable of distinguishing between settling and actual damage.
What I actually spent: three hundred dollars on caulk and backer rod, plus a weekend fixing the deck drainage myself. Three years later, the cabin is solid. Gaps haven’t progressed. Checks haven’t hosted anything. No interior water. Sometimes the boring, patient approach is just the right one.


Stay in the loop
Get the latest rustic cabin world updates delivered to your inbox.