Why Your Pump Runs But Nothing Comes Out
Cabin well systems have turned into a moving target with all the conflicting advice flying around about what to check first, what to replace, and when to just give up and call someone. I’ve been opening up my family’s place in the Catskills every spring for going on eleven years now — and I’ve stood in that basement more than once listening to a motor hum while absolutely nothing came out of any faucet in the house. That was humbling. Today, I’ll share everything I’ve figured out so you don’t spend your first weekend back doing what I did.
Here’s the thing nobody tells you upfront: the pump probably isn’t broken. What’s actually happening falls into one of two buckets — lost prime or pressure system failure. Sometimes both at once, which is its own special kind of morning.
Cabins are uniquely exposed to this. Seasonal properties sit empty for four, five, six months. Water evaporates out of lines. Pipes freeze and shift. Pressure tanks fail quietly while nobody’s around to notice. Then you show up with a carload of groceries expecting water, and instead you get nothing but a humming motor and a gauge sitting at zero.
The good news: most of this is fixable on your own. You won’t need a service truck pulling up your driveway, you will need a screwdriver, a pitcher of clean water, maybe a bucket, and about twenty minutes of your Saturday morning. That’s it.
Check the Pressure Tank First
Start here. Not the pump. Not the priming valve. The pressure tank.
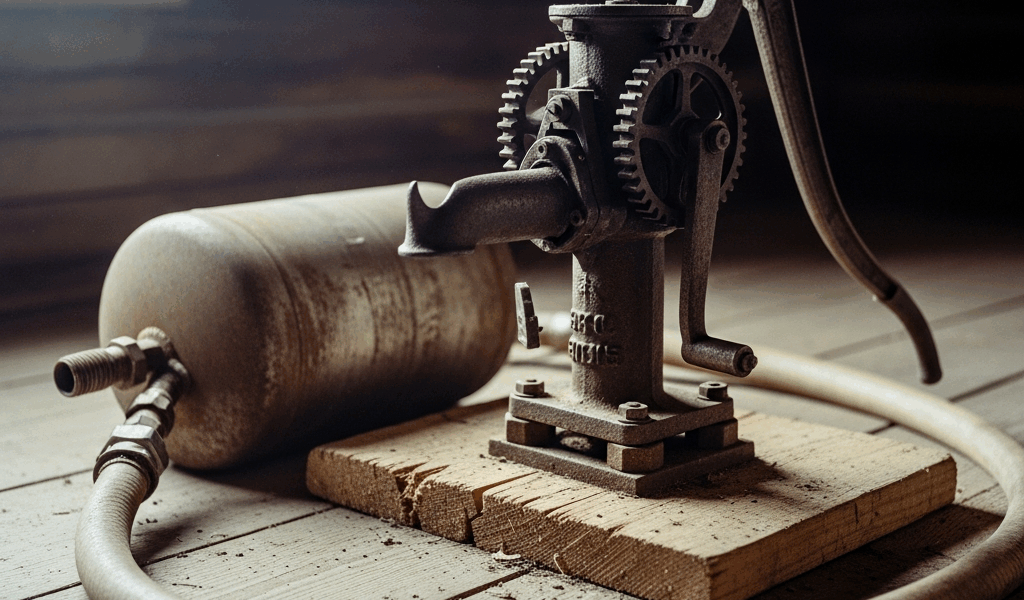
Find the metal cylinder — usually sitting right next to the pump in your mechanical room or basement. Put your hand flat against the side. Now knock on it three times with your knuckles, moving slowly from top to bottom. Listen to what it tells you.
A healthy tank sounds hollow at the top and solid near the bottom. Hollow means air. Solid means water has pushed into the air chamber where it doesn’t belong.
If the whole tank sounds like you’re knocking on a watermelon — dull and heavy all the way down — the bladder inside has failed. That’s the most common culprit I’ve seen in seasonal cabins, and it’s probably what killed your pressure.
But what is a pressure tank bladder? In essence, it’s a rubber membrane inside the metal shell that separates a pocket of pressurized air from the water side. But it’s much more than that — it’s what actually pushes water through your pipes when the pump isn’t actively running. When that rubber ruptures, water floods the entire tank, air pressure collapses to nothing, and you lose flow even though the pump motor sounds perfectly healthy.
Check your pressure gauge while you’re standing there. It’s usually mounted on the tank or on a nearby tee fitting — round face, numbers going up to 100 PSI or so. Normal operating range for a residential well sits between 40 and 60 PSI. Anything below 10 PSI and your tank has essentially quit on you.
A replacement pressure tank — say, a 44-gallon WX-202 or similar — runs $150 to $300 for the part. Installed by a service tech, figure $300 to $600 total depending on your area and tank size. If yours is more than eight years old and sounds completely solid top to bottom, stop diagnosing. Order the tank. That’s your answer.
If the tank sounds normal — that hollow-to-solid progression — move on to the next step.
How to Tell If Your Pump Has Lost Prime
A primed pump has water filling the intake line and the pump housing itself. Lose that prime and air moves in. The motor spins, the impeller turns, and absolutely nothing happens — no pressure builds, no water moves, no good.
Shallow well jet pumps and above-ground centrifugal pumps lose prime regularly. Submersible pumps — the kind lowered 80, 100, 200 feet down into the well casing on a drop cable — almost never lose prime. They can air-lock if the water table dropped significantly, which is a different situation I’ll get to in a moment.
Frustrated by a two-week dry spell last August that dropped my water table noticeably, I learned to check the prime situation before assuming anything expensive had failed. Saved myself a service call.
Three signs your pump has lost prime:
- The pump runs continuously without building any pressure at all.
- Your gauge reads zero or stays stuck below 10 PSI regardless of how long the pump runs.
- No water comes from any fixture — kitchen, bathroom, outdoor spigot, nothing.
All three showing up together? Lost prime. This happens in seasonal cabins because the system sits idle for months, water slowly evaporates from the intake line, and air creeps in through tiny gaps in fittings or around the foot valve. That’s what makes cabin well systems so maddening to us weekend owners — the enemy is time, not mechanical failure.
Step-by-Step: How to Re-Prime a Cabin Well Pump
Worth mentioning before anything else. Before you do anything, figure out which kind of pump you have. A jet pump or centrifugal pump sits above ground, usually right next to the pressure tank, with a pipe running down into the well. A submersible pump has an electrical line disappearing down into the well casing — that’s your only visible connection to it. Submersibles can’t be re-primed from above ground. If you’ve confirmed lost prime on a submersible system, skip ahead to the “When to Stop DIYing” section and make the call.
For jet pumps and above-ground centrifugal pumps — Goulds, Myers, Red Lion, Sta-Rite, whatever brand you’ve got — here’s the process:
- Shut the pump off. Flip the switch or trip the breaker. Wait thirty seconds. You don’t want the motor spinning while you’re loosening fittings.
- Find the priming plug or priming port. It’s usually a threaded plug sitting on top of the pump housing — sometimes labeled “Prime” or “Fill,” sometimes just an unmarked hex plug. If you don’t see it, pull the model number off the pump body and search “[Brand] [Model Number] priming port location” — you’ll find a diagram in under two minutes.
- Put a bucket underneath the pump. Water will spill when you open that plug. Not gallons, but enough to make a mess on your basement floor if you skip this step. Skip past the mistake I made.
- Loosen the priming plug slowly. Screwdriver or small wrench depending on the plug type. Don’t reef on it — these strip out more easily than you’d expect, and a damaged priming port turns a $0 fix into an annoying parts order.
- Pour clean water into the opening. Use a pitcher or a gallon jug. Pour slowly and steadily until water starts spilling back out the sides of the hole — that’s how you know the pump cavity is completely full. Keep pouring for another five seconds after that point.
- Replace the priming plug. Thread it back in and tighten it snug. You need a watertight seal, not a cracked housing. Firm, not aggressive.
- Switch the pump back on. It should hum for somewhere between twenty and forty-five seconds. If you hear pressure building and water starts moving through the system, you’re done. Go turn on a faucet and enjoy your morning.
- If it doesn’t hold, check the foot valve. The foot valve lives at the very bottom of your intake line, submerged in the well. It works as a one-way check — water comes up, but can’t drain back down when the pump stops. A failed foot valve means the intake line drains completely every time you shut off the pump, and you lose prime on a daily basis. The fix is replacement, which means a service call. Before you make that call though, prime the pump one more time and watch the pressure gauge for a solid hour. If it bleeds back to zero, the foot valve isn’t holding. That’s your answer.
One thing that matters a lot here: don’t run the pump dry for more than about sixty seconds at a stretch. The mechanical seal inside — the component keeping water separated from the motor windings — relies on water for cooling. Running dry, that seal overheats from friction and fails. Replacement runs $400 to $800 depending on the pump model. If you prime it and nothing catches within a minute, shut it off. Something else is going on and running it longer only makes the repair bill bigger.
When to Stop DIYing and Call a Well Service
Some situations genuinely belong in a technician’s hands, and recognizing them early almost always means a cheaper outcome. I’m apparently stubborn about this — I’ve wasted hours on problems that needed a professional from the start while my family ate sandwiches and complained about the bathroom situation.
Stop DIYing if any of these apply:
- The motor is hot or humming but the shaft won’t turn. Something is seized or jammed internally — could be bearing failure, could be sand accumulation inside the volute. Either way, you need a technician with the right tools.
- You’ve primed twice and pressure still won’t build past 5 PSI. Deeper problem — cracked impeller, discharge line leak, check valve failure. Chasing it further on your own wastes your weekend and delays the actual fix.
- Water comes out brown or sandy. This usually points to a compromised well casing or a collapsed intake screen. These problems accelerate without intervention and can contaminate your water supply.
- The tank is waterlogged and you’re not confident swapping it yourself. Draining the system, depressurizing safely, disconnecting and reconnecting lines — it’s manageable, but if you’re uncertain about any step, the $150 you’d save isn’t worth a flooded basement or a cracked fitting.
- Pressure won’t build even after re-priming and the foot valve checks out. Might be a broken discharge line underground, might be a circulation issue inside the pump. Neither of those is a weekend fix with basic tools.
Catching these things at the start of the season almost always beats ignoring them and coming back to a worse situation in six months. A $500 pressure tank replacement today is a much better Saturday than a $2,000 pump motor replacement next April. If your cabin is sitting empty again after this visit, fix whatever you find now — at least if you want water when you come back.

Stay in the loop
Get the latest rustic cabin world updates delivered to your inbox.