Is It Actually the Roof? Log Cabin Leak Diagnosis
Log cabin leak diagnosis has turned into a moving target with all the bad advice flying around. Most people see water dripping through their ceiling and immediately assume shingles. I spent three weeks troubleshooting a leak in my 1980s cabin — tore apart half the roofline, replaced flashing, climbed up there in the rain twice — before realizing the shingles had nothing to do with it. Today, I’ll share everything I learned so you don’t waste three weeks the way I did.
Log cabins leak differently than stick-frame houses. Water doesn’t behave the same way against stacked timber. It travels horizontally along the logs themselves, sometimes moving 8 to 12 feet from where it actually entered. You’ll find water running down the inside of a wall log, then pooling near a chink line a full 10 feet from the entry point. That horizontal travel means your leak might be entering through the roof but showing up at a window frame or at floor level. Don’t repeat what I did of chasing the puddle instead of the source.
Failed chinking mimics roof leaks perfectly. I’ve watched cabin owners replace entire rooflines when deteriorated mortar between logs was the real problem the whole time. The chink fails, water pools in the joint, gravity does the rest — straight down into living spaces below. That’s what makes log cabin diagnosis so frustrating for us owners.
Start your diagnosis in the attic on a rainy day. Bring a powerful flashlight. Not your phone light. Not a standard hardware store flashlight. Grab something like a Streamlight ProTac HL — runs about $65 — or a Maglite ML300L. Something that cuts through darkness and shows water trails clearly. Look for active water entry first. Wet spots mean current flow. Staining and mold mean chronic, ongoing problems.
Follow water pathways backward. See water running along a rafter? Trace it upslope. It came from somewhere higher. Look for daylight gaps in the roof sheathing. Check whether water is actually entering at that spot versus flowing down from above.
Cabin settling changes everything. These structures move — a lot. Flashing that fit perfectly five years ago might have quarter-inch gaps now. Chimney flashing separates. Metal roof panels shift. The house itself adjusts constantly, and your flashings aren’t always moving with it.
Check the exterior on a dry day. Walk the perimeter and note which chink line sections show the most cracking and separation. Compare that to where you’re seeing interior water damage. The culprit sits somewhere in between.
The 5 Most Common Log Cabin Roof Leak Sources
Roof Valleys and Intersections
But what is a roof valley? In essence, it’s where two roof planes meet and water concentrates. But it’s much more than that in a log cabin — the lower plane often meets the top log course at an angle that doesn’t shed water cleanly, which creates a problem you won’t see in standard construction guides.
Inspect your valleys during daylight. Look for debris accumulation, gutter overflow patterns beneath valleys, shingles curling or separating along valley edges. Metal valley liners should extend at least 4 inches on each side of the valley centerline. Many older cabins — mine included, apparently — have narrower installations that cause buildup and pooling.
Get up close. Use binoculars from the ground if climbing makes you uncomfortable. Check for granule loss on shingles adjacent to valleys. That indicates water force or ice dam activity. Check for any daylight visible through gaps between valley flashing and shingles.
Chimney Flashing Failures
Chimneys are leak magnets. The flashing around a chimney handles the transition from vertical masonry to sloped roofing — that’s a genuinely complex joint, and it fails more often than anything else on a cabin roof.
Examine the three sides of your chimney visible from the ground. Look for gaps between the flashing and chimney where they should be sealed. Look for caulking that’s cracked, missing, or pulling away. The upslope side is where water pooling happens. The downslope side is where ice dams form. Both sides cause headaches.
The flashing around your chimney isn’t one piece — it’s multiple. Upslope flashing sits underneath shingles. Downslope flashing sits on top. Side flashing bends around the chimney edges. If any single piece is loose, missing, or rusted, water finds its way behind the others fast.
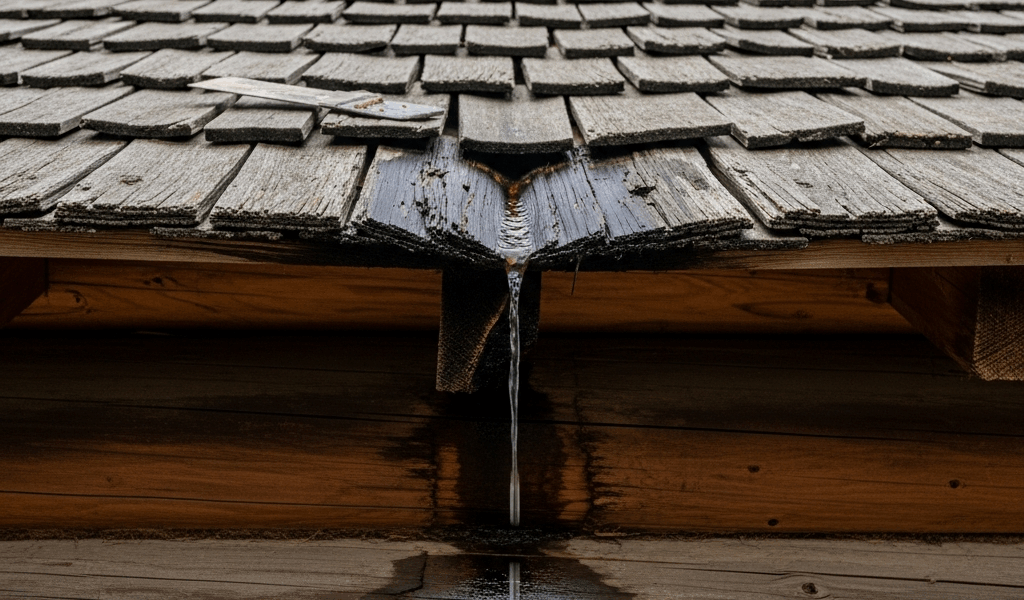
Lower Rooflines Meeting Upper Log Walls
The piece that matters most here. This is the log cabin-specific leak I see constantly — and the one that fooled me for three weeks. Many cabins have a main structure with a shed addition or wraparound porch. The lower roof meets the upper log wall of the main cabin, creating a horizontal ledge where water pools and has nowhere to go.
Water gets trapped in that corner. It soaks into the chinking. It works into the log ends. It pools behind the flashing — if flashing even exists at all. A lot of additions went up decades after the original structure, and whoever built them didn’t think much about water management.
Look at these junctions closely. Flashing here needs to extend up the log wall at least 4 to 6 inches and underneath the upper roofline shingles. Many cabins lack proper flashing entirely at these spots.
Gutter Failures and Overflow
Gutters fill with debris — pine needles, leaves, twigs, moss. Water backs up. It flows over the gutter edge and runs down the exterior wall. Logs absorb water like sponges. It pools in the chink lines and travels down into the cabin below.
Clean your gutters with a shop vacuum or a gutter scoop — the Amerimax model at Home Depot runs about $8 and is worth having. Honestly, this is the most preventable leak source and the one people ignore most consistently. A gutter full of last season’s pine needles isn’t draining. Period. You’ll see water staining on your cabin walls directly below clogged sections.
Check gutter pitch while you’re up there. Gutters need a gentle slope toward downspouts — roughly 1/16 inch of drop per 10 feet of length. Sagging sections pool water, usually because fasteners have corroded over time.
Downspouts matter too. They need to extend at least 4 feet away from the cabin wall, longer on upslope sides. Water dumping directly at the foundation keeps the base constantly wet — and wet foundations eventually become interior moisture problems.
Ridge Cap Failures
The ridge is the highest point of your roof. Ridge cap shingles cover that joint. They’re exposed, they take a beating from wind and UV exposure and temperature cycling, and they fail faster than field shingles because they experience more stress with less structural support underneath.
Look at your ridge from the ground with binoculars. Curled ridge shingles don’t seal against wind-driven rain. Nails holding ridge caps back out over time, creating gaps that are invisible until you’re up there with a flashlight.
The ridge cap is especially critical in cabins because interior spaces abut the ridge area directly. Leaks here become internal leaks fast — they don’t stay hidden long.
Emergency Temporary Fixes
You’ve identified the leak. Now you need to stop active water entry while you plan permanent repairs. So, without further ado, let’s dive in.
Roofing cement handles active drips. It’s not pretty, but it works for 6 to 12 months in most climates. Get Henry’s 208 Roof Cement or DAP Plastic Roof Cement — the black stuff in metal cans, roughly $12 to $18 per can at any hardware store. Don’t skimp here. You need something that stays flexible through temperature swings. Cheap cement cracks and peels by spring.
Locate the entry point from inside during rain. Mark it. Once dry, climb up and apply cement around the area — cover cracks in flashing, seal small gaps around chimney flashing, smooth it with a putty knife. It hardens over 24 hours.
Tarping the roof is another option. Get a heavy-duty tarp — minimum 6 mil thickness — and cover the affected roof section. I’m apparently harder on tarps than most people, and CCS Tarps rated for roofing hold up for me while standard blue tarps never last more than a few weeks. Position the tarp so water runs off the downslope side of the roof. Secure it with 2×4 battens and rope, not puncture fasteners — running the rope over the ridge and securing it on both sides. This prevents water from worsening the situation while you schedule repairs.
Inside the cabin, place a bucket under the drip. Not primarily for collection — that fills fast in heavy rain — but to prevent water from hitting wood directly. Falling water from 15 feet creates impact damage. It splashes and spreads. A bucket breaks that energy.
Don’t use duct tape on your roof. Don’t use expanding foam. Don’t try sealing things from the inside. These approaches are universally ineffective and they’ll make permanent repairs harder later.
Permanent Repair for Each Leak Type
Flashing Replacement at Chimneys and Walls
This is the repair you’ll probably face first. Remove old roofing material around the flashing. Pry out fasteners. Pull the old flashing. Clean the area down to bare sheathing.
Install new flashing with proper overlap. Chimney flashing should extend under the upslope shingles and over the downslope shingles. Wall flashing — where additions meet upper log walls — needs to extend at least 4 inches up the wall and underneath upper roofing. Use stainless steel or high-quality galvanized flashing — at least 26-gauge. Cheap aluminum flashing corrodes and fails in 5 to 7 years. That’s what makes quality materials worth the upfront cost here.
Seal flashing edges with roofing cement. All nail holes. All gaps. All transitions. Don’t skip this step.
Valley Repair
Failed valleys need full replacement. You’re removing shingles, replacing or reseating the valley liner, and reshingling. This is moderately complex work. If you’re not comfortable removing roofing, hire it out — improper shingling creates bigger leaks later. The valley liner should be metal — galvanized steel or aluminum minimum. Asphalt-based valley materials fail faster. Metal costs more upfront and lasts significantly longer.
Re-chinking Versus Re-flashing
Here’s the decision point. Is water entering through failed chinking, or through roof and flashing issues? These need completely different repairs.
If water is confirmed entering at chink lines — not traveling there from roof leaks — you need re-chinking. This is a significant project. Hire a professional. Modern chinking materials like Perma-Chink or Weatherall Ultimate perform far better than original mortar, but installation requires specific technique and experience.
First, you should fix the roof — at least if water is entering through roof areas and traveling to chink failures. Don’t re-chink until the roof is solid. You’ll just be doing it again within a season if you work backward.
Metal Roofing Advantages
Many cabin owners choose metal roofing during replacement. Metal might be the best option, as log cabin roofing requires superior water shedding with minimal penetration points. That is because standing seam systems eliminate most of the traditional failure points entirely — no exposed fasteners, no granule loss, no curling shingles.
Metal lasts 40 to 60 years versus 20 to 25 years for asphalt shingles. It costs more upfront — roughly $10,000 to $18,000 installed for a typical cabin — but it eliminates most leak sources in one shot. Worth considering seriously if your cabin is already 20-plus years old.
When the Leak Means a Bigger Problem
Chronic leaks cause damage you can’t see immediately. Water soaks into logs. Logs rot from the inside out. This takes time — years, sometimes.
Look for soft spots in logs. Press your fingernail into log surfaces near leak zones. If it dents easily, the wood is compromised. Professional log repair — replacing or stabilizing rotted logs — costs $2,000 to $8,000 or more per log depending on severity and location. That number gets uncomfortable fast.
Mold grows in damp wood. It’s a genuine health concern in enclosed spaces. If you smell mold or see dark staining inside walls, the damage extends beyond the visible leak. Thermal imaging — roughly $300 to $500 for a professional scan — reveals moisture in walls and cavities you simply cannot see otherwise.
Get a professional inspection if any of these apply: cabin over 30 years old, visible mold, soft wood, water damage in multiple interior locations, or historical water staining. A certified log home inspector runs $400 to $800 and identifies structural concerns you’ll miss on your own. That’s what makes professional diagnosis worth it — the problems you weren’t looking for.
Cost expectations for professional repairs: simple flashing replacement ($1,200 to $2,500), valley repair ($1,500 to $3,000), complete roof replacement ($8,000 to $20,000 depending on materials and cabin size), log replacement ($2,000 to $8,000-plus per log).
Start with diagnosis. Know where water actually enters before spending money. Follow the water backward. Fix the source, not the symptom — and your cabin will hold up for decades more.


Stay in the loop
Get the latest rustic cabin world updates delivered to your inbox.