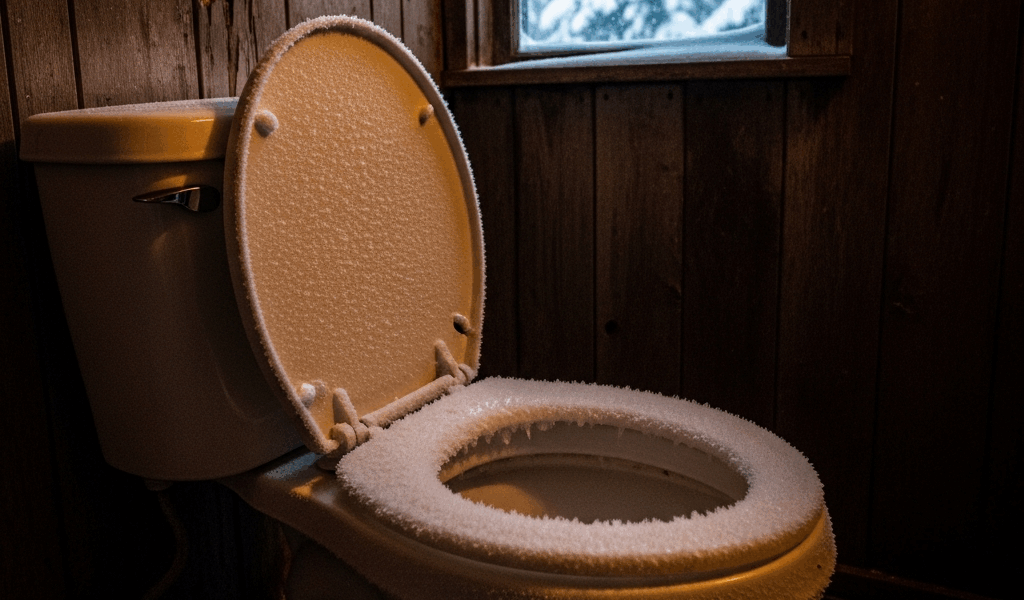
Why Cabin Toilets Stop Flushing in Winter
Cabin plumbing has shifted noticeably with all the conflicting advice flying around. Most of it assumes you’re living in a heated suburban home with a finished basement. You’re not. And that gap in the guidance costs people real money every winter.
As someone who spent years troubleshooting a family cabin upstate, I spent months getting comfortable with frozen toilet systems the hard way. Today, I will share it all with you.
The core issue is simple enough: water freezes. But which water, and exactly where it’s sitting when temperatures drop — that changes everything about how you approach the fix.
I showed up one Friday evening after the cabin had sat empty for three weeks in below-zero temps. Reached for the handle. Nothing. Not a gurgle, not a weak trickle — just the sound of my own frustration bouncing off the bathroom tile. That was January 2019, and I’ve been obsessive about winter prep ever since.
But what is a cabin toilet freeze, really? In essence, it’s ice forming somewhere inside a closed plumbing loop. But it’s much more than that. There are two distinct failure points: the supply line running from your shutoff valve to the fill mechanism inside the tank, and the trap — that U-shaped pipe underneath the bowl that holds standing water as a seal against sewer gas. Each one freezes differently. Each one breaks differently. And treating the wrong one first wastes hours.
Standard plumbing articles skip all of this. They assume municipal water pressure, insulated basements, pipes that have never seen frost. Off-grid and seasonal cabins operate in a completely different world. Supply lines run exposed along exterior walls. Low-flow tanks common in cabin setups fill sluggishly even under normal conditions, making partial ice buildup easy. Unheated bathroom traps sit full of standing water around the clock — just waiting for a cold snap. That’s what makes freeze diagnosis so particular to us cabin owners.
So, without further ado, let’s dive in.
Check the Tank First Before Anything Else
Open the tank lid. Look inside. That one step tells you almost everything.
Empty tank? The supply line froze before water ever reached the fill valve. Half-full? Either a slow freeze or a thaw already underway — honestly, that second scenario is good news. A normal-level tank that simply won’t flush points you straight toward the trap or something below the bowl entirely.
Finding the actual frozen section isn’t complicated. Follow the supply line from the cabin wall inward. In most cabins I’ve seen, that line runs exposed or barely wrapped through an unheated crawlspace or directly along an exterior wall. Run your hand along it. Frozen sections feel rigid and ice-cold — you genuinely cannot flex the tubing. Thawed sections feel cool but give slightly under pressure.
Watch for visual frost too. Ice crystals form on the outside of plastic lines that have frozen solid. Sometimes there’s a faint bulge in the tubing where expansion happened as the water turned. I’ve seen 3/8-inch supply line swell noticeably from a hard freeze — it’s subtle but visible once you know what you’re looking for.
Check the shutoff valve itself. Lots of people skip this. Water movement stops at the valve, so freezing concentrates there. Feel around the base and the handle. Frost on the valve body is a dead giveaway.
Probably should have led with this warning, honestly: don’t pump the flush handle repeatedly hoping it’ll unstick. Each attempt cycles the float arm up and down. Cold-embrittled plastic doesn’t handle that well. I cracked mine doing exactly this — replacement ran me $60 at the local hardware store plus an embarrassing phone call to admit I’d made the situation worse. Learn from what tripped me up.
How to Thaw a Frozen Toilet Supply Line
Turn the cabin heat up first. Set the thermostat to 70°F and give the interior about 15 minutes to begin warming before you start any targeted heat work. This step prevents refreezing as you go and genuinely speeds up the whole process.
While you’re waiting — grab a heat gun. Same tool people use for stripping paint or shrinking heat-wrap on electrical projects. Medium heat setting. If you don’t own one, any hardware store carries them for $25 to $40. I use a Wagner HT1000 that I picked up for $32 at Home Depot. Cheaper than a single service-call trip fee, which starts around $150 in most rural areas.
Start at the shutoff valve and work methodically toward the wall. Hold the gun 4 to 6 inches off the tubing surface — no closer. You’re not trying to melt ice in 30 seconds. That approach creates steam pressure inside the line and cracks plastic. Move the gun back and forth along each section for roughly two minutes, then feel the tubing to gauge progress.
Expect 20 to 45 minutes for the full job. I’ve done it in 25 minutes on a mild day when the cabin had only been cold for a weekend. I’ve also spent 90 minutes on a line that had been frozen solid for eight days in 15-degree weather. Both situations resolved — it just takes however long it takes.
No open flames. Ever. No propane torch, no lighter near plastic supply line. Melting PVC smells awful and releases fumes you don’t want in a small cabin bathroom. A hair dryer works as a substitute for the heat gun — just slower. I’m apparently a heat-gun convert and my Wagner works great while the hair dryer approach never quite satisfied me on hard freezes. One neighbor swears by wrapping frozen sections in towels soaked in hot water. That actually works if patience isn’t an issue, though the heat gun moves faster.
You’ll know the line cleared when you feel water shifting inside the tubing — there’s a faint gurgling sensation — or when the tank starts refilling on its own. Listen for the fill valve cycling. That hiss of water entering the bowl means you won.
What to Do If the Bowl or Trap Is Frozen
Full tank, no movement. That’s a frozen trap situation. Messier to deal with.
First — figure out whether it’s completely solid or just sluggish. Pour a bucket of room-temperature water slowly into the bowl. If it drains at all, even slowly, the system is partially working. Wait 30 minutes as cabin heat climbs and try a normal flush. Partial freezes often resolve themselves without much intervention. That was true for me twice last winter.
For a completely frozen trap, you need hot water — not boiling. That distinction actually matters a lot. Boiling water hitting cold porcelain creates thermal shock. I’ve seen a cracked bowl firsthand at a neighbor’s place after exactly this mistake. Heat water to around 140°F to 150°F — roughly the hottest a standard faucet produces, or about 30 seconds shy of a full boil on the stovetop. Pour it slowly into the bowl. Very slowly. You’re warming the trap gradually, not trying to blast it.
Pour small amounts every few minutes. After 10 to 15 minutes, attempt a flush. Any movement at all — even slight — means you’re making progress.
Here’s the part nobody mentions: sometimes a hard freeze cracks the trap itself before you ever get to it. You won’t see the damage from above. Get down and look at the underside of the toilet base and the visible trap section from the cabinet below if accessible. Wet spots, frost residue, or actual ice on exterior porcelain surfaces all indicate a crack. Hairline fractures are invisible from standing height.
A cracked trap means replacing the toilet. No patch works here. Budget $300 to $600 for a basic replacement — that’s installed, with a plumber driving out to a cabin location. I’ve seen quotes hit $750 in more remote areas.
How to Stop This From Happening Again
RV antifreeze. This single product has saved me twice. Not automotive antifreeze — propylene glycol, the RV-specific stuff, which is non-toxic and rated safe for potable water systems. Before you lock the cabin for winter, pour roughly a gallon directly into the toilet bowl. It keeps the trap fluid even when interior temps drop toward zero.
Shut off the main water supply valve before you leave. Open the fill valve briefly to drain remaining water from the supply line down into the bowl. No standing water in the line means no ice formation in the line. Simple math.
Insulate exposed supply lines with foam pipe wrap — the pre-slit kind that costs $4 to $8 per 6-foot section at any hardware store. Wrap every section of tubing that runs along an exterior wall or through unheated space. This one step alone prevents the majority of frozen-line calls I’ve ever heard about from other cabin owners.
Keep the cabin above 45°F even when closed. Most cabin owners I know set thermostats to 50°F through winter. That modest baseline heat prevents the worst of it. Electric baseboard heaters on a simple timer do this cheaply if propane costs are a concern.
If your setup uses a composting toilet rather than a standard flush system, the trap freeze issue largely disappears — but frozen flush water in the tank is still possible depending on the model. Research your specific unit. The Separett Villa 9215 and the Nature’s Head handle cold differently, for instance.
That $4 foam wrap kept me from a $400 repair bill two winters ago. The math isn’t complicated. Do the winterizing before you leave, not after you arrive.

Stay in the loop
Get the latest rustic cabin world updates delivered to your inbox.